This project was my fall 2020 senior capstone project at the University of Texas at Dallas School of Arts, Technology, and Emerging Communication. It was made solely by me.
My project is a 3d modeling application where instead of modifying vertices, edges, and faces, you directly manipulate the mesh as if it were a physical object. In this case, that object is made from a clay-like substance. The project’s initial plan was to be made for VR use so that you could use your hands or premade tools to manipulate the mesh, however this as well as a couple other features were not implemented due to time constraints. I believe that this project is worth continuing to develop after I graduate, so I will continue to do so. Improving the accuracy and efficiency of the simulation and implementing VR interaction are the first things on the list.
You can find the project’s code on my GitHub. And here is the download if you would like to try it out yourself! Make sure to check out the rest of my portfolio for other neat projects.
Development Process
Initial Idea
With the advancement of VR technology there is a wealth of new possibilities for both games and applications. For a while I wondered about how cool it would be to include realistic artisan objects in games without needing to use real objects made by craftsmen imported via photogrammetry. Such a method is very costly and takes considerable time. There are a few 3d modeling programs that have been purpose-made for VR, but every single one of them is a traditional modeling program where the user directly edits the mesh’s vertices, edges, and faces. What if instead of needing to manipulate a mesh in such technical ways a modeler, or craftsmen, could make something very similar to how they would with a real material such as clay, wood, or metal? In VR, most techniques could be replicated and used on an advanced material simulation that mimics its real-life counterpart well enough.
Research and Prototyping
My initial research included how other VR modeling programs work as well as the basics of simulated volumes. Unfortunately, or maybe fortunately, none of the programs I could find had a simulated mesh that could be manipulated. My initial research on how the simulated mesh would work gave me some ideas but learning how to manipulate a volume of nodes using linear algebra in just one semester was not a viable option if I wanted to complete my project.
Truthfully, the majority of my time spent on the project was spent on prototyping the simulated volume. Creating the simulation turned out to be far more difficult that I originally expected it to be. Because of this I had to end up reducing my scope by not implementing VR interaction. Before I started on what the project currently is I went through 4 different iterations of the simulation. Because I wanted to avoid using linear algebra due to my poor grasp on how it was used in simulations, I tried to think through every aspect of the simulation on my own. My plan was to start out in 2d, then extrapolate it into 3d.
The first prototype was my attempt at something where the nodes could freely move and tried to maintain their structure based on which nodes are nearby them in 3d space. This was not only inefficient but didn’t even work because of my poor grasp of node-node interaction. The idea was that each node was like a generalized atom and the interactions between them would define how the material functioned.
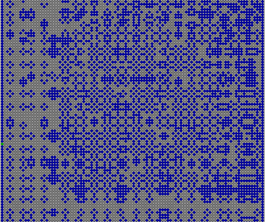
In the second prototype I switched to a grid (2d array) of nodes so I could quickly retrieve which nodes were next to each other. The grid was an actual representation of where nodes were in space so that if they moved to be in another grid space I could still find their neighbors without needing to store excessive amounts of data or manually handling changes in neighbors. Unfortunately, I had an issue where the squares of the grid were surprisingly not circles, which meant that it was possible for two nodes to occupy the same grid space, which would essentially erase one from the simulation. With how I implemented node interaction in my final product, I think it would be beneficial to return to a similar structure like this because it allows for a simple amorphous simulated volume. Additionally, I still did not fully understand how node-node interactions should work. While this prototype did “work” and was very efficient, it did not work well enough because of how physics steps would break it and the fact that I had not yet considered the concept of a rotational/bending constraint (at this time I didn’t even know what a constraint was). In this model, forces were propagated from each node to each neighboring node per physics tick, which caused some forces to act like a slow wave.
The third prototype did away with the grid and instead opted for a non-amorphous system where each node kept track of its neighbors. Additionally, during the creation of this prototype, I developed a way to propagate outside forces extremely accurately and efficiently (<= O(n) time, where n is the number of nodes) by using a queue system. Unfortunately, the simulation still did not function very well, again due to not having every constraint in mind. This prototype came the closest to the final product, and if I had implemented a bending constraint, I would have likely used it as my main project.

At this point I decided that instead of wracking my brain trying to figure out why my simulation kept having issues like nodes sliding past each other, when on paper it seemed like it should work fine, I did additional research. A couple days of research and asking around led me to the Position-Based Dynamics (PBD) simulation, which in reality was very similar to what I had made already, albeit much more complex. I found two papers (cited below) by researchers at Nvidia, as well as a GitHub of a project that implemented a PBD simulation (also cited below) that helped me understand what I was missing. The papers detailed which constraints were needed and how they are formulated, and the GitHub had exactly how it could be implemented, although it wasn’t in C# or Unity. These implementations used advanced linear algebra however, and I did not have the time nor the means to learn and understand their methods. So, with the new knowledge of constraints in hand, I made my 4th prototype. This PBD-like prototype worked for the most part but was still missing correct implementation of the constraints and a few other things. It was the base I used for my final implementation.
Project
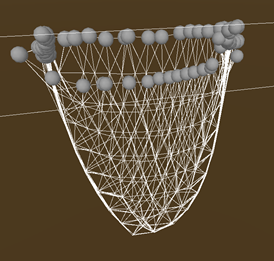
Using the 3rd and 4th prototypes as a base, I started to shape what the final simulation would be. The minimum constraints I needed for the simulated volume to function in an acceptable manner were: a static constraint to prevent the simulation from passing through designated objects, a stretch constraint to prevent nodes from being farther than a set distance from each other, a compression constraint to prevent nodes from being too close to each other, and a bending constraint to make sure nodes maintained the same angle from each other. Additionally, for a truly accurate simulation, I would need a volume constraint to keep the simulation from changing its overall volume, but this was not created due to lack of time and difficulty of implementation. The minimum viable product also required a mesh, which had to be generated dynamically, a way to export the mesh, and a basic system to interact with the mesh.
The simplest constraint to make was the stretch constraint. In every prototype this was the only constraint that actually worked. It checks if a node is farther away from another node than a set distance, which in this case is the initial distance. If the node is farther, it would move it to bring it back into where it should be. Most of the constraints use their initial conditions as their ideal conditions, which unfortunately prevents very much true deformability and also full-body rotation. I was working on fixing this until the very end of the project and have included an experimental rotation mode. This experimental mode works but can very easily break due to unsolved issues. Compressive deformability is functioning, but its effects are hardly noticeable without the experimental rotation mode enabled. Every constraint other than stretch was met with difficulty and required lots of trial and error to get functioning.
The static constraint represents a rigid collider that works with the simulation. While it was not difficult to make, it had its fair share of bizarre bugs. I had to manually define how the constraint works with different primitive shapes, so I only included spheres and rectangular prisms as they were the simplest. Throughout the prototypes, actually getting the nodes to not slowly slide through the collider was challenging but worked by the 3rd prototype. Additionally, the constraint has friction, bounciness, and handles collisions. Friction is still buggy due to the many variables at play in the simulation, but it works well enough. Bounciness works perfectly, so I left its value at 0 and did not include an option to adjust it. Collision handling makes use of an impressive bit of the simulation code, a force propagator. This queues nodes with forces, then solves them in order, building forces within the simulation. By propagating the normal force back up into the simulation, it lets the simulation act as one continuous body.
The compression constraint went through many iterations as I prototyped. Originally it worked by moving it based on its current distance plugged into a complex formula, but this caused violent vibrating at worst and flimsiness at best. The current version works essentially exactly the same as the stretch constraint, with an additional section to handle pliability and rigidity. Pliability/squishiness works by adjusting the desired target distance by a percentage of what would be moved, and rigidity works by doing the opposite and restoring the target to the original distance. Unfortunately, true pliability cannot function without the addition of a volume constraint, which I was unable to get to. Without a volume constraint and perfect pliability, the model would fall into a puddle of itself. A volume constraint would, in theory, keep the volume of the model the same regardless of its form. I do have a way for this to work, but the method of calculating volume I have reduced the application’s FPS by half when run once per FixedUpdate.
The rotational constraint is perhaps the most complex constraint needed. Early on the project I did not realize the need for this constraint, which was the primary reason for prototype 3’s failure. In later prototypes and for most of the final project I used the simplest implementation of it, where each node tries to make sure their neighbors are pointed in the initial direction. Later on I brainstormed ways for it to be fully rotatable, rather than always returning to the initial rotation. I expected it to be as simple as keeping track of which way each node was pointing, then rotating the initial directions by that amount. This was not simple. Keeping track of the individual rotations of each node was a vague idea, but I was eventually able to get that part to work (albeit not in the most accurate way, which I believe is the source of the current rotational issues). Nodes orient themselves based on the averaged rotational difference between the initial and current directions to their neighbors. While this works, corner nodes cause major issues (I excluded them for now) and if a single node rotation somehow gets oddly rotated, it will destroy the entire structure. This is included in the project as of right now as an experimental rotation setting. The experimental rotation has functioning pliability and rigidity similar to how it works for compression. Due to the differences in how they work, I separated the values for compressive and rotational pliability and rigidity.
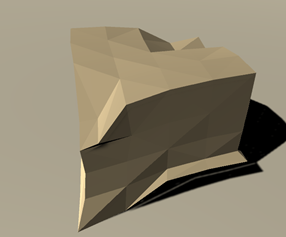
I expected the mesh generation to be the second most challenging aspect of the project, and it was, although not nearly to the degree that the simulated volume was. While I did not do any prototyping for the mesh generator, the algorithm I came up with to build the mesh did go through several iterations. Initially, I hoped that the ordering of the node’s neighbors on the surface of the volume was consistent enough for a recursive function to go through each and make triangles, but it was not. After a few days of trial and error I landed on using a recursive function that did the same as my original idea, but kept track of how many triangles each edge was a part of, as well as multiple minor checks to make sure that the placement of each tri was valid. It functions wonderfully for what I made it for, but if I were to switch to an amorphous simulation, it would require some adjustments to function. Additionally, it may not be efficient enough in terms of memory usage and algorithm speed to be run every frame, which would be important for larger and amorphous volumes respectively. Mesh exportation was actually simple. I found a resource online that someone had written that converted Unity meshes into a .obj file. Writing this on my own would have likely not been possible in the given time. The link to the code is cited below.
Interaction was relatively simple to implement. Although the goal was to have VR, the number of complications I encountered prevented me from attempting it. Instead I opted for a simple click and drag perpendicular to the screen plane. I added UI to spawn static interaction objects that could be used as tools. The click and drag both moves the interaction objects and can pull/push surface nodes. The tools can be selected and resized or moved closer or farther away with scroll wheel. The camera is a simple hold right-click to rotate and WASD to move.
Future Goals
While all the core aspects of my capstone project are there, I feel it is still far from the goal I had originally envisioned. It goes without saying that before it can start to function as imagined I will need to implement VR interaction. Additionally, the program will never work properly unless I manage to complete the rotational constraint, make an efficient volume constraint, and make the whole simulation amorphous, where each node does not have to keep their initial neighbors. I do actually plan on continuing the project after college. It is an idea that I feel would sell and be extremely useful for developers and artists. The greatest challenges other than the implementation of the remaining features will be making everything more efficient. Right now the simulation runs on one CPU thread, but I have the means to convert it into a Unity Compute Shader, allowing it to run potentially tens of thousands of times faster, allowing for smooth use in VR and with much larger simulated volumes.
In the far future of this project, I plan on developing additional materials including wood and metal. While the current simulated volume is a great base for these, each one would require their own special additions like shearing, grain, node-specific material properties, heat capacity, and thermal conductivity just to name a few. If I make it this far, it might even be worth it to refactor the simulation to use linear algebra. This would make it much more efficient.
Citations
Position-Based Simulation Methods in Computer Graphics: http://mmacklin.com/EG2015PBD.pdf
XPBD: Position-Based Simulation of Compliant Constrained Dynamics: http://mmacklin.com/xpbd.pdf
Position Based Dynamics Library: https://github.com/InteractiveComputerGraphics/PositionBasedDynamics
ObjExporter: http://wiki.unity3d.com/index.php?title=ObjExporter